Voicemail Codes to Remember for ATT Phone Users

If you have AT&T – but use another voice mail server like Google Voice, here are some codes that are useful to know. Actually these codes are useful to know, even if you use the default voice mail, because you can do things like set the amount of time your phone rings, before your voice mail picks up.

*004* is a command that is used to set Forwarding, Busy, and No Answer, all at once. It defaults to 10 seconds. (The 10 seconds is a guesstimate – but I think it’s correct). Here is the pattern to use for *004* command. Replace the 4445551212 with the actually number you want to send your calls to.

*004*14445551212*11# (Then press Talk or Send)

SPECIAL NOTE FOR GOOGLE VOICE USERS
The destination number, will not always be your own google voice number. Log into Google Voice (Phones) and check the activation settings.

You can also, individually send commands for forwarding, busy, and no answer transfer. This is also cool, you can ask your phone to send you the status of each of these, so if you’re not sure of your current status, there are commands for that as well.

Command: Forward all calls. This might be useful if you are switching phone numbers (maybe to a new carrier??) This option forwards all calls, without even ringing your phone – just a straight up forward. I don’t have a clear answer on this – I’ve asked several agents – and it depends on who you ask – you get a different answer. The question is about billing. Do you get charged minutes against your plan, for forwarded calls? Say you have forwarding on to your home. You cell phone is off. Someone calls your cell phone, which forwards to your home. You talk for 60 minutes. Does the 60 minutes get deducted from your calling plan? My thought is … No you don’t. But … be careful, because I’m not sure, and neither are the AT&T representatives.

Turn Off all Call Forwarding: #002# (Then press Talk or Send)
Forward All Calls command prefix: *21*
Activate: *21*14445551212*11# (Then press Talk or Send)
Cancel & Retain: *21*11# (Then press Talk or Send) this option remembers the number, but disables forwarding
Re-establish: *21*11# (Then press Talk or Send) this option engages forwarding to the last number (notice this is just a toggle command
Cancel & Forget: ##21*11# (Then press Talk or Send) Disable forwarding, and forget the last number used to forward
Status: *#21*11# (Then press Talk or Send) this sends you back status of your forwarding number

If Busy:
Turn OFF If Busy Call Forwarding: #67# (Then press Talk or Send)
Activate: *67*14445551212*11#
Cancel & Retain: #67*11#
Re-establish: *67*11#
Cancel & Forget: ##67*11#
Status: *#67*11#

if no answer: Ring for 15 (see the 15 at the end of the activate command) seconds, and then forwards to destination number.
Turn OFF No Answer Call Forwarding: #61# (Then press Talk or Send)
Activate: *61*14445551212*11*15#
Cancel & Retain: #61*11#
Re-establish: *61*11#
Cancel & Forget: ##61*11#
Status: *#61*11#

If Unreachable: (When you phone is off, or out of a service area)
Turn Off Unreachable Call Forwarding: #62# (Then press Talk or Send)
Activate: *62*14445551212*11#
Cancel & Retain: #62*11#
Re-establish: *62*11#
Cancel & Forget: ##62*11#
Status: *#62*11#

#8 Windows 7 Search and Filter (With Video)

Vista and Windows 7 offer a filtering mechanism that helps you get where you going, or find what you’re looking for a little faster. This search box (sometimes called filter box) is commonly found in the top right corner of the window you’re working in. Click, Type, Go. And the best part is … it really works. Helping you find what you’re looking for.

This video tip/trick not only shows you how this filter box works, but also let’s the secret keyboard shortcut out of the bag. How do you access the search box from the Keyboard? I can’t guarantee that this works in all windows, of all programs, but [CTRL][E] usually does the trick.

Enjoy the Show!

Windows 7 Search & Filter

#7 Windows 7 Options to Show Desktop (With Video)

The greatest advancement in Desktop Computing, without a doubt, is the ability to Multi Process. You can run multiple applications at once. In fact – i think it’s impossible now to **NOT** run multiple or **MANY** applications at once.

Combine this with the icons on your desktop. You probably (like most people) use your desktop to arrange your commonly used launch applications. Your desktop is kind of your home screen that you use to launch your applications. So … if you have a bunch of applications running, that are covering your desktop, how do you get back to your desktop to start your next application? This video shows you how.

Enjoy the video…

How I saved $30 using Bing.com Cash Back (With Video)

I’m looking for a new desktop scanner, with an auto document feeder, that can scan both sides (known as Duplex scanning). Against the better judgment of a friend, I’m looking for (was looking for) a NeatCo.com NeatDesk scanner. My buddy suggested a different model, but it was almost double the price.

After you search around online, and decide on a purchase the next step is to decide where to make the purchase.

I really like to buy online with big brand sites like Amazon.com, Buy.com, BestBuy.com (with in store pickup option), Staples.com, OfficeMax.com, CostCo.com, etc. The reason is for safety, and a better return policy. I’ll also step out to eBay.com for sellers that have really high sales numbers (like over 500) and a perfect, or next to perfect feedback rating (over 99%).

When searching for this scanner on Bing.com, I found an 8% Microsoft Bing cash back link. It’s an eBay link, and you have to pay with PayPal.com, and you have to use BuyItNow on eBay. Perfect, this is what I was going to do anyway. As you know by now, I’m a fan of video blogging, so here’s a video that shows the whole process. The bottom line is that I just saved $50 on this brand new in box scanner. $379 instead of $399 (with free shipping) and, yes **AND** $30 cash back from Bing.

Enjoy the Video …

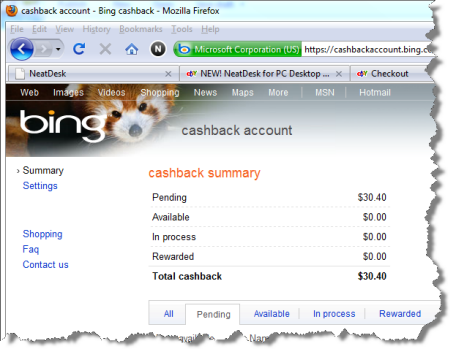
And I forgot to show this at the end of the video, but here is a screen shot of my pending $30 cash back, on http://cashbackaccount.bing.com


image


Using CloudDB.com for everyday lists

I use CloudDB.com for a lot of things. I program against the API, I use the Web Interface, and I even use the iPhone application to check my data. I rely on it a lot, and I thought since I talk about it so much, I would do a quick screen cast showing something that happened this weekend.

Basically, I have a list of about 30 items, that I want to keep track of so that someday it’ll be there if I need it. Where do you keep track of this kind of data? Please leave a note in the comments and let me know. I could have used a million solutions for this …

  • Word/Excel (saved on local machine)
  • Could have just emailed myself
  • Kept it on paper (and later lost it 🙂
  • But I use CloudDB.com

If you’re interested, here is the screen cast, that shows from scratch how to setup a table, with a couple columns, enter some data, and even setup a relationship between two tables.

Enjoy the Video …

If you like this kind of stuff, head on over to http://my.clouddb.com and use the registration link. Put in ScottCate.com as the invitation code, and we’ll see about getting your account in the next round of accounts that get created.