Archives for December 2009

#7 Windows 7 Options to Show Desktop (With Video)

The greatest advancement in Desktop Computing, without a doubt, is the ability to Multi Process. You can run multiple applications at once. In fact – i think it’s impossible now to **NOT** run multiple or **MANY** applications at once.

Combine this with the icons on your desktop. You probably (like most people) use your desktop to arrange your commonly used launch applications. Your desktop is kind of your home screen that you use to launch your applications. So … if you have a bunch of applications running, that are covering your desktop, how do you get back to your desktop to start your next application? This video shows you how.

Enjoy the video…

How I saved $30 using Bing.com Cash Back (With Video)

I’m looking for a new desktop scanner, with an auto document feeder, that can scan both sides (known as Duplex scanning). Against the better judgment of a friend, I’m looking for (was looking for) a NeatCo.com NeatDesk scanner. My buddy suggested a different model, but it was almost double the price.

After you search around online, and decide on a purchase the next step is to decide where to make the purchase.

I really like to buy online with big brand sites like Amazon.com, Buy.com, BestBuy.com (with in store pickup option), Staples.com, OfficeMax.com, CostCo.com, etc. The reason is for safety, and a better return policy. I’ll also step out to eBay.com for sellers that have really high sales numbers (like over 500) and a perfect, or next to perfect feedback rating (over 99%).

When searching for this scanner on Bing.com, I found an 8% Microsoft Bing cash back link. It’s an eBay link, and you have to pay with PayPal.com, and you have to use BuyItNow on eBay. Perfect, this is what I was going to do anyway. As you know by now, I’m a fan of video blogging, so here’s a video that shows the whole process. The bottom line is that I just saved $50 on this brand new in box scanner. $379 instead of $399 (with free shipping) and, yes **AND** $30 cash back from Bing.

Enjoy the Video …

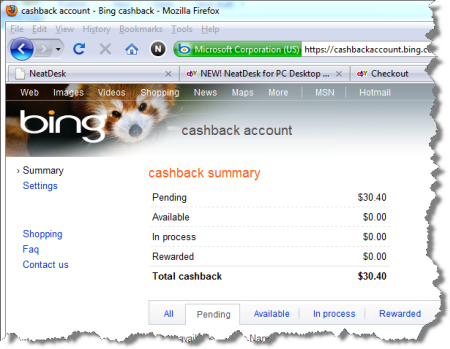
And I forgot to show this at the end of the video, but here is a screen shot of my pending $30 cash back, on http://cashbackaccount.bing.com


image


Using CloudDB.com for everyday lists

I use CloudDB.com for a lot of things. I program against the API, I use the Web Interface, and I even use the iPhone application to check my data. I rely on it a lot, and I thought since I talk about it so much, I would do a quick screen cast showing something that happened this weekend.

Basically, I have a list of about 30 items, that I want to keep track of so that someday it’ll be there if I need it. Where do you keep track of this kind of data? Please leave a note in the comments and let me know. I could have used a million solutions for this …

  • Word/Excel (saved on local machine)
  • Could have just emailed myself
  • Kept it on paper (and later lost it 🙂
  • But I use CloudDB.com

If you’re interested, here is the screen cast, that shows from scratch how to setup a table, with a couple columns, enter some data, and even setup a relationship between two tables.

Enjoy the Video …

If you like this kind of stuff, head on over to http://my.clouddb.com and use the registration link. Put in ScottCate.com as the invitation code, and we’ll see about getting your account in the next round of accounts that get created.

#5 Windows 7 TaskBar Keyboard Shortcuts

“Aero” is the name of the glitter and glitz and gives Windows 7 a lot of the eye candy you see in the Scott Cate Windows 7 video tutorials. Some users do not have Areo installed on their Windows 7. It’s possible that their video card (or other hardware) isn’t strong enough, or maybe they’re running a virtual instance of Windows 7. Whatever the reason, if you don’t have Aero enabled, you don’t have Aero Peek. This is the feature that gives you a popup preview of the applications that are running, as you hover over the launch icons in the task bar.

The following Key Board shortcuts will help you navigate your open (and to be opened) applications faster.

  • [WINDOWS LOGO]+[NUMBER] – Open the item in that position (if the application is already open, this action will toggle minimize/restore.
  • [WINDOWS LOGO]+[NUMBER] – Open an additional instance of the numbered application. In the video, another instance of Internet Explorer.
  • [WINDOWS LOGO]+[CTRL]+[NUMBER] – Cycle through the like applications that are open. In the video we have several instances of Internet Explorer running, along with many other applications. Where regular [ALT]+[TAB] or [WINDOWS LOGO]+[TAB] will cycle through all open applications, [WINDOWS LOGO]+[CTRL]+[NUMBER] will just cycle though our running instances of Internet Explorer.
  • [WINDOWS LOGO]+[ALT]+[NUMBER] – Open the context menu of the numbered item. With Internet Explorer, this shows your most recently used pages/tabs, as well as any pinned items that you may have.

And if a picture is worth a 1000 words, you should be happy I did the video, which saves me a lot of typing to show and explain all these keyboard shortcuts in action. Enjoy the video tutorial.

#4 Windows 7 Magnifier Presenter KB Shortcuts

If you ever have an audience that is looking at your screen, you have a couple of options to change your screen resolution. You can go all out, and actually change your resolution, but that sometimes has a drastic effect that manipulates all your applications, toolbars, etc. Remember that there is a difference in what you should do, based on your audience. If there are 3 or 4 of you hovered around your monitor for a few minutes, then changing your resolution is probably not a nice choice. On the other hand, if you have hundreds or thousands of people in your Microsoft TechEd audience, then you absolutely change your resolution to 1024X768.

In both situations, if you are projecting your screen, it’s helpful to know about the Windows 7 Magnifier.

The video will show how all this works, but for keyboard junkies, here are the keyboard shortcuts …

  • [WINDOWS-LOGO-KEY][+] – Activate the Magnifier, centering the magnification on your current cursor position, magnified at the last zoom percentage.
    • If the magnifier is already active
    • [WINDOWS-LOGO-KEY][+] will increase the magnification percentage by 100
  • [WINDOWS-LOGO-KEY][-] – Lower the Magnification percentage in increments of 100 [500%,400%,300%,200%,100%]
  • [WINDOWS-LOGO-KEY][ESC] – Close the Magnifier, and show the full screen